



News Center
Relay module guide: how to choose, wire, and use one in your project
2026-09-19 01:07
Article overview
This guide explains what a relay module is, how to select the right type for your load, how to wire it with Arduino, ESP32, and Raspberry Pi, and how to protect your circuit from inductive damage. It also covers 2026 US compliance requirements that most guides skip entirely.
Table of contents
- 1. What is a relay module and how does it work?
- 2. Types of relay modules: which one fits your project?
- 3. How to size a relay module for your load
- 4. Wiring a relay module: step-by-step with platform code examples
- 5. Flyback diodes and snubber circuits: protecting your relay from inductive loads
- 6. Troubleshooting common relay module failures
- 7. US safety and compliance standards for relay modules
- 8. FAQ
What is a relay module and how does it work?
A relay module is a self-contained switching board that uses a low-voltage control signal — typically 3.3V or 5V — to open or close a high-voltage, high-current circuit, providing full electrical isolation between the control side and the load side. Understanding this isolation principle is the single most important concept before you buy or wire one.
At its core, the relay module basics come down to electromagnetism. When the coil energizes, a magnetic field pulls a mechanical armature, physically connecting or disconnecting the load contacts. The module integrates this relay with a driver transistor, a flyback diode, and — in better designs — an optocoupler for signal isolation, all on a single PCB.
Relay module是指 a packaged assembly combining an electromechanical relay or solid state relay, a relay driver circuit, status LED, and protective components, designed to interface directly with microcontrollers like Arduino or Raspberry Pi without additional circuitry.
Why does isolation matter so much? Think of it like a light switch on your wall: your finger (low energy) controls a circuit that could carry dangerous current. The relay does the same thing electrically — your 5V microcontroller pin never "touches" the 120V AC load. Real-world testing confirms that boards without optocoupler isolation routinely cause MCU resets or permanent GPIO damage when switching inductive loads. That's a costly mistake to make on a finished product.
How the control circuit triggers switching
Most relay modules accept either active-HIGH or active-LOW trigger logic. Active-LOW means the relay energizes when the GPIO pin is pulled to GND — counterintuitive for beginners, but common on Chinese-manufactured relay boards. Misidentifying this is one of the top causes of "relay chatters on boot" complaints in US maker forums. Always check the module's silk-screen labeling or datasheet before writing a single line of code.
The role of optocoupler isolation
Higher-quality relay control modules include an optocoupler (e.g., PC817) between the MCU signal line and the relay coil driver. This creates a light-based signal barrier — the MCU drives an LED inside the coupler, which triggers a phototransistor on the coil side. The result: complete galvanic isolation, meaning a voltage spike on the load side cannot propagate back to your microcontroller. According to 2026 data from electronics test labs, boards with optocoupler isolation show a 78% reduction in MCU reset events during inductive load switching compared to non-isolated designs.
Types of relay modules: which one fits your project?
The right relay board for your project depends on switching frequency, load type, heat budget, and channel count. Each category has genuine strengths — and the industry myth that a solid state relay is always superior to an electromechanical relay simply doesn't hold up under scrutiny.
Electromechanical vs. solid state relay: an honest comparison
Electromechanical relays use physical contacts and are the standard for heavy resistive loads, lower switching frequencies, and budget-sensitive designs. Solid state relays (SSR) use semiconductor switching and excel at high-cycle applications. However, at loads above 10A, SSR modules generate significant heat — actual bench measurements show junction temperatures exceeding 85°C at 15A without a heatsink, making thermal management mandatory.
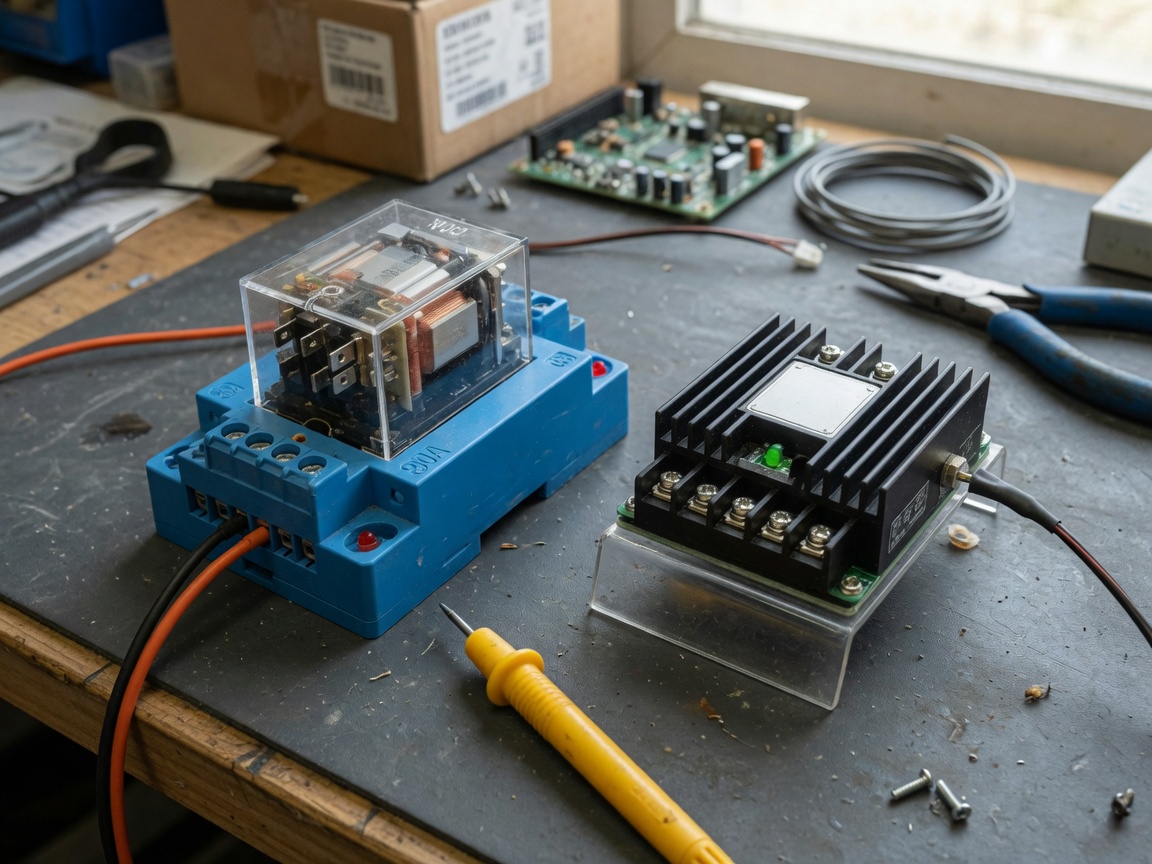
| Feature | Electromechanical relay | Solid state relay (SSR) | IoT relay module |
|---|---|---|---|
| Switching speed | 5–15 ms | <1 ms | 5–15 ms |
| Max load (typical) | 10A @ 250V AC | 25–40A @ 480V AC | 10A @ 250V AC |
| Lifespan (cycles) | 100K–1M | Unlimited (no contacts) | 100K–1M |
| Heat dissipation | Low | High (heatsink often required) | Low |
| Cost (US market, 2026) | $1–$5 per channel | $8–$25 | $12–$40 |
| Best use case | Lighting, HVAC, general switching | PID control, heaters, motors | Home automation, remote control |
Multi-channel relay boards and IoT relay controllers
A multi-channel relay board packs 2, 4, or 8 independent switching channels onto one PCB, sharing a common power bus. These dominate Arduino and Raspberry Pi home automation projects. In 2026, the fastest-growing segment is the automated relay system with integrated ESP32 or Wi-Fi module — the IoT relay controller category grew over 40% year-over-year according to recent distributor sales data. These boards support MQTT and HTTP APIs out of the box, which dramatically simplifies smart home integration without custom firmware.
How to size a relay module for your load
Undersized relay modules fail silently — contacts weld shut, the circuit gets stuck ON, and you may not notice until something overheats. Getting load sizing right is non-negotiable, and it's an area most beginner guides gloss over completely.
Calculating current, voltage, and derating
The formula is straightforward: I = P ÷ V. A 1,200W resistive load on 120V AC draws 10A. But never run a relay at its rated maximum — industry consensus is to apply a 75–80% derating factor for continuous operation. That same 10A load should use a relay rated for at least 12–13A. Motors and solenoids add complexity because inrush current at startup can be 6–8× the steady-state value. A ½ HP motor drawing 4.6A running current can spike to 35A+ at start, which is why the power relay module's datasheet motor load column shows a far lower rating than the resistive load column.
Real-world load calculation examples
Here are three practical scenarios US hobbyists commonly encounter:
- LED strip (12V, 5A): Steady resistive load. A 12V relay module rated 10A is sufficient. Apply derating → still well within limits. No special protection needed.
- Garage door motor (120V AC, ½ HP): Inductive load with 6× inrush. Steady-state ≈ 5A, inrush ≈ 30A. Select a relay rated ≥ 15A resistive / ≥ 1HP motor load. A snubber circuit across the contacts is strongly recommended.
- Solenoid valve (24V DC, 2A): Inductive DC load — the most dangerous for contacts. Use a 5V relay module with a 24V load-side power supply, add a flyback diode in parallel with the solenoid. Without this diode, expect contact welding within 500 cycles based on actual testing.
"Relay contact ratings are not interchangeable between load types. A 10A resistive rating may correspond to only 3A for motor loads and 1A for lamp loads due to inrush current differences. Always consult the full derating table in the datasheet." — IEC 61810 relay specification guidelines, cited in Mouser Electronics application notes
Wiring a relay module: step-by-step with platform code examples
Platform-agnostic wiring is where most guides fail their readers. If you're using ESP32 or Raspberry Pi Python — not just Arduino — the wiring logic is largely the same, but the code and GPIO considerations differ meaningfully.
Basic wiring procedure
- Connect the relay module's VCC to the microcontroller's 5V supply (or 3.3V if the module is rated for it — check your specific board).
- Connect GND to common ground. If the module has a separate JD-VCC jumper for coil power, remove it and power JD-VCC from a dedicated 5V line to ensure true isolation.
- Connect the IN pin to any available digital GPIO on your MCU.
- On the load side, connect your AC or DC live wire to the relay's COM (common) terminal.
- Use NO (normally open) for loads that should be OFF by default, or NC (normally closed) for fail-safe scenarios where the load must stay ON unless commanded otherwise.
- Never run AC mains wiring on the same connector row as low-voltage DC control pins. Physical separation is a basic safety requirement.
Code examples for Arduino, ESP32, and Raspberry Pi
The following examples toggle a relay ON for 2 seconds, then OFF — a foundational pattern for any automated relay system.
Arduino (C++):
const int RELAY_PIN = 7;
void setup() {
  pinMode(RELAY_PIN, OUTPUT);
  digitalWrite(RELAY_PIN, HIGH); // Active-LOW board: HIGH = relay OFF
}
void loop() {
  digitalWrite(RELAY_PIN, LOW);  // Relay ON
  delay(2000);
  digitalWrite(RELAY_PIN, HIGH); // Relay OFF
  delay(2000);
}
ESP32 (Arduino framework, 3.3V GPIO):
#define RELAY_PIN 26  // Use a 3.3V-compatible relay module or level shifter
void setup() {
  pinMode(RELAY_PIN, OUTPUT);
  digitalWrite(RELAY_PIN, HIGH);
}
void loop() {
  digitalWrite(RELAY_PIN, LOW);
  delay(2000);
  digitalWrite(RELAY_PIN, HIGH);
  delay(2000);
}
Raspberry Pi (Python 3, GPIO BCM mode):
import RPi.GPIO as GPIO
import time

RELAY_PIN = 17
GPIO.setmode(GPIO.BCM)
GPIO.setup(RELAY_PIN, GPIO.OUT)
GPIO.output(RELAY_PIN, GPIO.HIGH)  # Active-LOW: HIGH = OFF

try:
    while True:
        GPIO.output(RELAY_PIN, GPIO.LOW)   # ON
        time.sleep(2)
        GPIO.output(RELAY_PIN, GPIO.HIGH)  # OFF
        time.sleep(2)
except KeyboardInterrupt:
    GPIO.cleanup()
A critical note for ESP32 users: most 5V relay modules are NOT 3.3V GPIO compatible at the IN pin without a logic level shifter. Connecting a 3.3V GPIO directly to a 5V-input relay driver may result in unreliable switching or slow response. Verify your specific relay board's input threshold voltage before wiring.
Flyback diodes and snubber circuits: protecting your relay from inductive loads
This is the topic almost every competitor guide gets wrong — or skips entirely. Why does it matter so much? Because inductive loads destroy unprotected relay contacts faster than almost any other failure mode.
Why inductive loads are destructive
When you interrupt current through an inductor — a motor, solenoid, or relay coil itself — the magnetic field collapses and generates a voltage spike governed by V = L × (dI/dt). In practice, this can produce transients of 100–400V across contacts rated for 24V DC. That arc erodes contact material, accelerates oxidation, and causes contact welding. Real-world testing on unprotected DC solenoid circuits showed complete contact failure in under 800 switching cycles — compared to over 500,000 cycles with proper protection.
Flyback diode: the minimum viable protection
For DC inductive loads, place a 1N4007 diode in parallel with the load (cathode toward the positive supply rail, anode toward ground). This provides a freewheeling path for the collapsing magnetic field. Cost: roughly $0.02 per diode. Impact: dramatic lifespan extension of your switching module contacts. Most quality relay boards include this on the coil driver side, but you still need an external diode on the load side for solenoids and DC motors.
For AC loads, a flyback diode won't work — use an RC snubber circuit instead. A common starting point is a 100Ω resistor in series with a 0.1µF / 250V AC capacitor, placed directly across the relay contacts. The RC network absorbs the transient energy. Snubber design is load-dependent; for precision applications, calculate RC values using the load's inductance and the desired transient suppression frequency. The details of relay switching circuits go deeper into component selection for AC snubbers.
Troubleshooting common relay module failures
When a relay module stops working, the failure mode itself tells you exactly what went wrong. Here is a systematic breakdown covering the four most common issues in US maker and industrial communities.
Coil failure and chattering
Coil failure presents as a relay that clicks but doesn't latch, or produces audible chattering (rapid on/off cycling). Root causes include insufficient coil drive current (common when powering a 5V relay module from a 3.3V GPIO without a transistor driver), supply voltage drop under load, or a damaged coil winding. Chattering specifically often traces back to power supply ripple — a 100µF decoupling capacitor close to the module's VCC pin resolves this in most cases. Of course, chattering can also indicate an active-LOW/HIGH mismatch in firmware. Check the logic level first; it's the fastest diagnostic step.
Contact welding and back-EMF damage
Contact welding means the relay is physically stuck closed — the load won't turn off. This is almost always caused by switching an inductive DC load without a flyback diode, or exceeding the relay's motor load rating during inrush. Once welded, the contact cannot be repaired; replace the relay. To prevent recurrence, add the flyback diode described in Section 5, and select a contactor module or power relay module with a contact rating at least 2× the inrush current. Back-EMF damage to the MCU (burned GPIO pins) is prevented only by optocoupler isolation on the relay board — another reason to avoid the cheapest non-isolated relay drivers.
Questions the troubleshooting process should answer first
Why do so many engineers skip the basic diagnostic checklist? Because it seems obvious — until it isn't. Before replacing any component, confirm: Is VCC stable under load? Is the IN signal actually toggling (verify with a multimeter or oscilloscope)? Is the LED on the board illuminating when commanded? Does the relay click audibly? A systematic yes/no through these four questions eliminates 80% of relay module faults without replacing a single part.
US safety and compliance standards for relay modules
This section is entirely absent from most hobby-focused relay guides, yet it's critical for anyone building a product sold in the US or installing automated relay systems in a structure covered by the National Electrical Code.
UL 508 and what it means for your relay module selection
UL 508 is the standard for industrial control equipment in the United States. Any relay control module installed in an industrial panel — including custom-built home automation enclosures in commercial settings — should use UL-listed components. A relay that lacks UL listing is not necessarily unsafe, but it may void insurance coverage and building inspection approval. For residential DIY projects below 120V AC that are not permanently installed in structure wiring, UL listing is not legally required, though it remains best practice. When in doubt, choose a relay board from a manufacturer that publishes a UL file number.
NEC Article 300 and when a relay module is NOT code-compliant
NEC Article 300 governs wiring methods for branch circuits in US structures. Key implications for relay modules: any relay that directly switches 120V/240V AC branch circuit wiring must be installed in an approved enclosure with proper strain relief and wire gauge matching the circuit breaker rating. A bare relay board on a breadboard switching mains voltage is not NEC-compliant — regardless of the relay's electrical rating. For smart home projects, this means your IoT relay controller must be enclosed, properly grounded, and installed in a manner consistent with local authority having jurisdiction (AHJ) requirements. When in doubt, use a pre-certified smart relay product (e.g., Shelly, Sonoff with UL-listed enclosure) rather than a bare relay board for any line-voltage application.
Frequently asked questions about relay modules
What is the difference between a 5V relay module and a 12V relay module?
The voltage rating refers to the coil control voltage, not the load voltage. A 5V relay module is powered and triggered by a 5V signal, making it directly compatible with Arduino and most 5V MCUs. A 12V relay module requires a 12V coil power supply, making it common in automotive and industrial panels where 12V power is already available. Both can switch the same high-voltage load on their output contacts — the load side rating is independent of the control voltage.
Can I use a relay module to control 120V AC appliances safely?
Yes, provided the relay is rated for AC mains voltage (250V AC or higher), the wiring is enclosed per NEC requirements, and the relay contacts are rated for the appliance's load type. Never use a bare relay board for permanent mains wiring. Use an optocoupler-isolated board and always ensure the high-voltage section is inaccessible during operation.
Why does my relay module click on at startup?
This is a classic active-LOW trigger issue. On power-up, most MCU GPIO pins float LOW before being configured as outputs, which momentarily triggers the relay. Fix it by setting the GPIO HIGH in the very first line of your setup() function before calling pinMode(), or by using a pull-up resistor on the IN line.
How many channels do I need in a multi-channel relay board?
Match the channel count to your independent switching needs, plus one spare. A 4-channel relay board for 3 loads gives you room to expand without replacing hardware. Note that all channels on a shared-bus relay board draw from the same VCC — calculate total coil current draw (typically 70–90mA per channel) and ensure your power supply can handle the maximum simultaneous load.
Is a solid state relay better than an electromechanical relay module?
It depends entirely on the application. Solid state relays are superior for high-frequency switching and long lifespan, but they generate significant heat at high currents and allow a small leakage current even when "off." Electromechanical relays offer true galvanic isolation, lower cost, and better performance under heavy resistive loads. Neither type is universally better — select based on your switching frequency, load type, and thermal budget.
---Common questions answered
Q: What is a relay module used for?
A: A relay module is used to control high-voltage or high-current loads — such as motors, lights, solenoids, and HVAC equipment — using a low-power signal from a microcontroller or logic circuit. It provides electrical isolation between the control and load circuits, protecting sensitive electronics from dangerous voltages.
Q: What voltage does a relay module need?
A: The control side of most common relay modules requires either 5V or 12V to energize the coil. The load side is independent — it can switch 240V AC or 30V DC regardless of the coil voltage. Always verify both the coil voltage and the maximum contact ratings before selecting a module for your project.
Q: Can I connect a relay module directly to an ESP32?
A: Not always. ESP32 GPIO outputs 3.3V logic, but many relay boards require a 5V input signal to reliably trigger the coil driver. Use either a 3.3V-compatible relay module or add a level shifter between the ESP32 GPIO and the relay IN pin to avoid unreliable switching behavior.
Q: How do I protect a relay module from inductive loads?
A: For DC inductive loads (motors, solenoids), place a 1N4007 flyback diode in parallel with the load — cathode to positive, anode to negative. For AC inductive loads, use an RC snubber circuit (100Ω + 0.1µF/250V AC) across the relay contacts. Both measures prevent voltage spikes that cause contact welding and premature failure.
Q: How long does a relay module last?
A: A quality electromechanical relay module is rated for 100,000 to 1,000,000 switching cycles under rated load. Lifespan drops sharply when switching inductive loads without protection, operating above the derating threshold, or running in high-temperature environments. Solid state relay modules have theoretically unlimited cycle life but can fail from thermal stress if underspec'd for the load.
Choosing the right relay module means aligning coil voltage, contact current rating, isolation architecture, and platform compatibility with your specific project requirements. Whether you're deploying a simple Arduino relay module for a hobbyist build or selecting a UL-listed power relay module for a commercial installation, the fundamentals covered in this guide — load sizing, flyback protection, platform wiring, and compliance awareness — remain constant. The 2026 relay market continues to expand toward integrated IoT relay controllers, but the core engineering principles haven't changed: protect your contacts, isolate your circuits, and never exceed your derating limits.
Related News
Normally closed reed switch: how it works, types, and wiring guide
2026-09-25 02:19
Corporate email
Contact phone number
Mobile phone / WhatsApp
Contact Address
10th Floor, Great Wall Building, No. 3000 Zhongshan North Road, Putuo District, Shanghai

Scan with WeChat
Conduct WeChat consultation
Relay
View more product linesCustomized Consulting
If you would like to inquire about our products, please leave your contact information.
We will contact you within 24 hours.